Homemade Filo Pastry Recipe for Thin Sheets
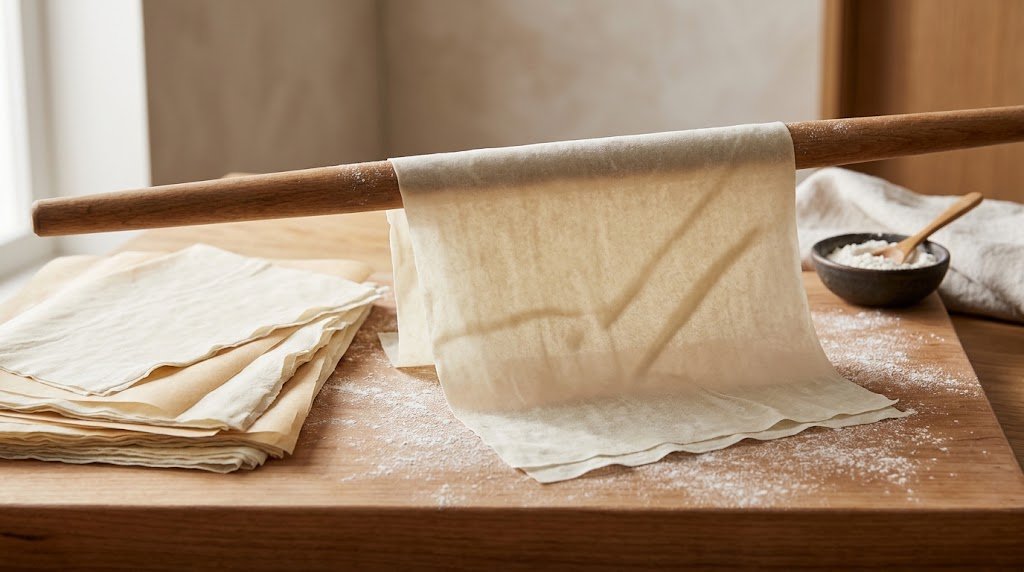
A pliable flour-and-water dough rolled into thin individual sheets for layering in sweet or savory pastries. This filo pastry recipe makes thin homemade sheets from flour, water, oil and a small amount of vinegar. Filo, also spelled phyllo, is used across Eastern Mediterranean and nearby cuisines for pastries that become crisp when layered with fat and baked. The dough itself is not puff pastry, and it does not contain laminated butter layers. Allow about two hours to mix, rest and roll ten sheets, with more time if you are new to thin rolling. Homemade sheets may be slightly thicker and less uniform than factory-made filo, which is normal. Keep unused dough covered and work patiently from the center outward, aiming for a sheet thin enough to see a faint shape through it.
Rest the dough and keep it covered
Kneading makes the dough cohesive and stretchy; resting allows that strength to relax so it rolls instead of springing back. If a partly rolled sheet resists, cover it for a few minutes rather than pushing hard enough to tear it.
Cornstarch mixed with flour provides a useful light dusting that helps sheets separate. Brush off heavy excess before layering. This recipe produces raw pastry sheets, so cooking time is intentionally zero here; the final filled dish needs its own baking method and food-safety checks.
Recipe at a glance
Yield: 10 thin sheets, about 30 cm/12 inches each. Active preparation: about 60 minutes. Cooking: about 0 minutes. Total elapsed time: about 120 minutes. Includes about 60 minutes of resting, rising, cooling or chilling, as specified in the method. These are raw sheets; baking time for the final filled pastry is additional.
How to make homemade filo pastry for thin sheets
Recipe card
Homemade Filo Pastry Recipe for Thin Sheets
Equipment: Kitchen scale; bowl; smooth work surface; long thin rolling pin; dough scraper; pastry brush; parchment; plastic wrap or clean barely damp cloth.
Ingredients
Main
Instructions
Make the dough
Mix 300 g flour and salt in a bowl. Add water, oil and vinegar. Stir, then knead on the work surface 8–10 minutes until smooth and pliable. If very sticky, rest briefly before deciding whether it needs a small amount of dusting flour.
Rest covered
Form a ball, cover tightly so no skin develops, and rest 60 minutes at comfortable room temperature. Prepare the work surface and mix cornstarch with the dusting flour.
Divide and start rolling
Divide into 10 equal pieces. Keep nine covered while working with one. Dust the surface and piece lightly, flatten and roll from the center outward, turning frequently.
Roll very thin
Continue rolling to about 30 cm/12 inches across, using a little dusting mixture as needed. The sheet should be thin enough to show a faint hand shadow beneath it. If it springs back, cover and rest 5–10 minutes, then continue.
Keep sheets protected
Brush off loose excess dusting mixture. Lay sheets between parchment and cover the stack with plastic wrap; do not let a wet cloth touch the dough directly. Repeat with remaining pieces and use promptly or refrigerate as directed.
Use in a finished pastry
Layer sheets with the fat specified in your filling recipe, trimming to fit its pan. Homemade sheets vary in thickness, so use weight and coverage as well as sheet count when adapting a recipe. Bake according to that finished dish, not as uncooked dough.
How to tell when it is ready
At this dough stage, sheets are thin, flexible and largely translucent, with no dry cracked rim; baked doneness belongs to the finished pastry recipe.
Tips
- Keep every waiting piece covered.
- Use a long rolling pin and turn the dough often.
- Pause if gluten makes the sheet shrink back.
- Dust lightly and remove loose excess before assembly.
Troubleshooting
- Sheets tear: rest longer and roll with lighter pressure.
- Dough sticks: dust the surface lightly and rotate before it adheres.
- Edges dry: improve covering and roll one piece at a time.
Substitutions
- Use neutral oil instead of olive oil for a less pronounced flavor.
- Commercial filo can replace homemade in a finished dish, but compare coverage and weight rather than assuming identical sheet counts.
Variations
- Roll fewer larger sheets if your board and pin allow it; yield and handling change.
- For rustic pie pastry, leave sheets slightly thicker, recognizing the baked texture will be less delicate.
Serving suggestions
- Use for a savory spinach-and-cheese pie with its own filling recipe.
- Layer in a nut-filled syrup pastry.
- Wrap small savory parcels, adjusting for sheet thickness.
- Use for a fruit-filled rolled pastry with a suitable tested baking method.
Make ahead
Make the dough ball a day ahead and refrigerate tightly wrapped after kneading. Let it become pliable while still covered before dividing and rolling; include this extra warming time in your schedule.
Storage
Wrap raw sheets tightly with parchment between them and refrigerate up to 24 hours. Let the sealed stack lose its refrigerator chill briefly before opening, then keep covered while working. For best quality, use fresh rather than freezing a loosely handled homemade stack.
Food safety
Raw flour is not ready to eat. These sheets must be baked as part of a finished dish. If using meat, egg or dairy fillings, follow that recipe’s temperature and storage requirements.
Frequently asked questions
Is filo the same as puff pastry?
No. Filo uses separate thin sheets layered with fat during assembly; puff pastry has fat laminated into the dough through folding.
Why is cook time listed as zero?
This is a raw pastry-sheet recipe. The baking time depends on the filling, pan and finished pastry and is not included in the dough preparation time.
More recipes to try
Spotted a detail that needs correcting? Contact the FeastDelights editors.