Canelé Recipe with Vanilla and Rum
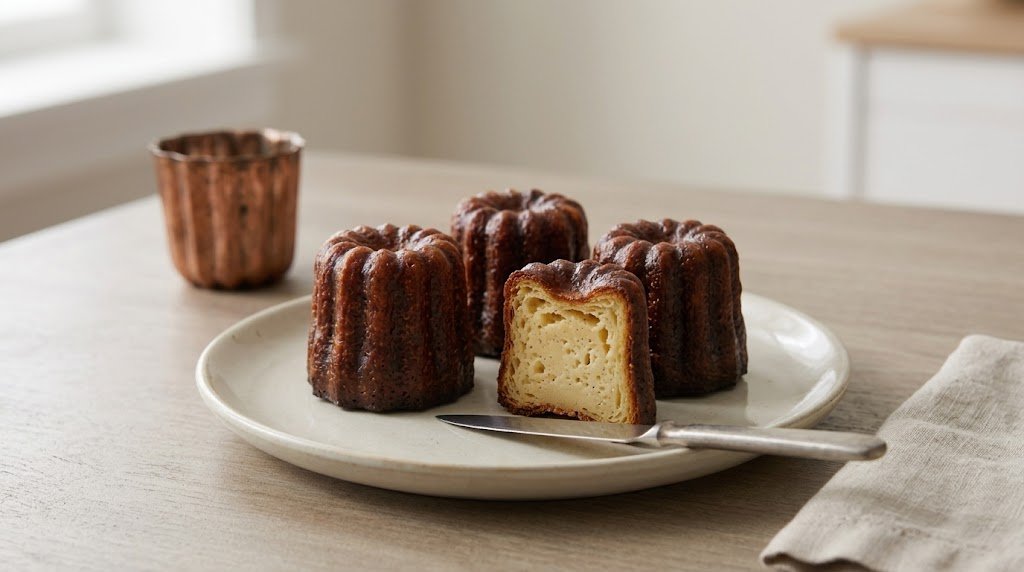
Fluted French pastries with a dark caramelized shell and a moist vanilla-rum center, made with an overnight-rested batter. This canelé recipe makes the small fluted pastries associated with Bordeaux: dark and caramelized outside, soft and moist within. A thin vanilla-and-rum batter rests in the refrigerator overnight before baking in individual metal molds. The waiting time is important, so start the day before you want to serve them. Mixing is straightforward, but the oven and mold size have a strong effect on the crust, making visual checks more useful than a timer alone. The batch is sized for sixteen standard molds of roughly 70–80 ml capacity. Serve the canelés after they have cooled, when the shell has firmed and the contrast with the tender center is easiest to appreciate.
Use standard metal molds and plan an overnight rest
A canelé mold provides both the fluted shape and a large contact area for browning. This schedule is for metal molds about 5 cm/2 inches tall, not miniature molds or silicone trays. Check the maker’s heat limit before using the initial hot oven.
The batter should be fluid, closer to crêpe batter than cake batter. Mix without beating in a large foam, strain any lumps and chill covered. These are custardy pastries rather than fluffy cupcakes: increasing flour to make a thick batter changes their defining texture.
Recipe at a glance
Yield: 16 standard canelés. Active preparation: about 25 minutes. Cooking: about 75 minutes. Total elapsed time: about 890 minutes. Includes about 790 minutes of resting, rising, cooling or chilling, as specified in the method.
How to make canelé with vanilla and rum
Recipe card
Canelé Recipe with Vanilla and Rum
Equipment: 16 metal canelé molds, approximately 70–80 ml each and rated for 240°C; rimmed baking tray; saucepan; bowl; whisk; fine sieve; jug; pastry brush; cooling rack.
Ingredients
Main
Instructions
Warm the milk
Heat milk and 30 g butter over medium-low heat until the butter melts and the milk is steaming, without a rolling boil. Leave for about 10 minutes until warm rather than hot.
Mix a thin batter
Whisk sugar, flour and salt in a bowl. Stir in eggs and yolks with about one-third of the warm milk to form a smooth paste. Gradually stir in remaining milk, rum and vanilla without whipping in air. Strain into a jug.
Rest overnight
Cover and refrigerate for 12–24 hours. The stated total allows 12 hours of chilling plus cooling and brief temperature adjustment. Stir gently before filling molds.
Prepare molds and oven
Set a rack in the lower-middle oven and heat to 240°C/465°F conventional. Brush room-temperature metal molds very thinly with clarified butter, removing pools at the bottom. Set on a rimmed tray. Let the batter stand for about 15 minutes while the oven heats.
Fill and bake
Fill each mold to about 1 cm/⅜ inch below its rim. Bake 15 minutes at 240°C/465°F, then reduce to 190°C/375°F and continue 45–55 minutes. Rotate the tray once after 40 minutes. The exposed tops should be deep brown.
Check and unmold
Using heatproof gloves, invert one mold onto a rack to check its sides. If pale, return it to the mold and bake the tray another 5–10 minutes. When evenly dark brown, unmold all pastries carefully and cool about 45 minutes before eating.
How to tell when it is ready
All sides are dark caramel brown, the shell holds its shape after unmolding, and the center is moist and set rather than liquid raw batter.
Tips
- Weigh flour and sugar rather than packing measuring cups.
- Stir settled batter gently after chilling.
- Use a thin mold coating; pools of butter create greasy pale patches.
- Bake one mold first if your oven runs hot or you are using unfamiliar molds.
Troubleshooting
- Pale sides: continue baking and confirm the oven is fully preheated.
- Pastries rise out of molds: avoid foamy batter and check that molds are not overfilled.
- Burnt tops with pale sides: move the tray lower and tent the tops lightly near the end.
Substitutions
- Replace rum with 30 ml milk for a rum-free vanilla version; flavor will change.
- Vanilla bean seeds can replace extract; infuse one split pod in the warm milk and remove the pod before mixing.
Variations
- Orange accent: add 1 tsp finely grated orange zest to the milk, then strain.
- Mini canelés require a separately adjusted baking schedule; do not use this standard-mold timer unchanged.
Serving suggestions
- Serve cooled on a small pastry plate.
- Pair with espresso or black tea.
- Offer berries alongside without covering the crust.
- Keep sauces separate so the shell stays crisp.
Make ahead
Make and refrigerate batter 12–24 hours before baking. Bake early on the serving day and cool completely before plating.
Storage
Best the day they are baked. Refrigerate in a covered container for up to 3 days; the shell softens. Re-crisp at 180°C/350°F for 5–8 minutes, then cool before eating. Freeze for up to 1 month for quality, thaw refrigerated and re-crisp.
Food safety
Refrigerate egg-and-milk batter promptly at 4°C/40°F or below. Rum does not make raw batter safe; do not taste it. Metal molds stay very hot during unmolding. Baking does not guarantee complete alcohol removal.
Frequently asked questions
Can I use silicone molds?
They conduct heat differently and generally produce a softer, less deeply browned shell. Use a schedule developed specifically for your silicone mold rather than assuming this metal-mold schedule is identical.
Why do I need so much advance time?
The overnight rest hydrates the flour and allows bubbles to settle. It is part of the method, not just convenient storage.
More recipes to try

Spotted a detail that needs correcting? Contact the FeastDelights editors.